
 |
| Picture by Rolling Speed Photography |
As per usual I decided on a last-minute cosplay of Gamora
from Guardians of the Galaxy for CosXpo with only two evenings to get
everything sorted. So, as you can guess I didn’t have time for a make up test.
This was my trial by fire first make up attempt on the day of convention!

Here’s your list of tools needed to create the look I did on the cheap…..you can of course get much better and more professional SFX make up should you want to go all in. For attempt one with no notice, I didn’t have the time to get all the products I would have liked to. This was the kit list of what I used.
- Glue Stick in purple, Elmers or UHU recommended
- Setting Powder Revolution Coconut Baking Powder Loose
- Beauty Blender (cheap Primark ones worked fine)
- Snazaroo Face Paints in colours: Pale Green, Dark Green, Bright Green, Black, Silver
- Face Paint brushes from Hobby Craft
- Mixed bag of sponges (cheap Primark ones)
- Pack of make up brushes (cheap Primark ones)
- Primer. I used a Primark primer and a layer of Porefessional from Benefit Cosmetics.
- Setting Spray.
- Eye Shadow Pallet
- Afflano Highly pigmented Green Eyeshadow Pallette Avocoados
- Green Lipsticks from Amazon –
- Metallic Lipstick by Cosmic Moon – Green – For Mesmerising metallic lips
- Halloween Lipstick by Moon Terror – Zombie Green – SFX Make Up
Starting tips...
Ensure you have all your products laid out ready to use. I set up a work station with a cup of water, all my tools, some kitchen roll for cleaning brushes, all my products. I prepped by putting my hair up and in a wig cap. I actually pulled by wig cap a bit more forward than i usually would as I didn't want to get green face paint stuck in my hair line.
Brow Blocking
The first thing I needed to do was get rid of my own
eyebrows. Now before you pick up a razor and make a big mistake this can be
done by brow blocking just like drag queens do using a purple glue stick! I
personally watched this YouTube video from Luna Lestrange that you can watch
here!
My weapon of choice for brow blocking was a purple Elmers glue stick. You can use any brand but most videos you will watch will rate Elmers as the best. Elmers is an American brand which I thought would be hard to find in the UK however I picked up a 5 pack from Home Bargains for £2.99 in their craft section, bargain! I rolled up the glue stick a little and pushed it right over the hairs upwards and combed it tightly upwards on to the forehead. You can then blow dry it into place as you want to work in thin layers that you apply, dry, and build up on rather than one big thick layer. You can use a baby wipe to clean off the excess above and below the brow after each application before the glue dries.
After the first layer of flattening the brows the layers after are all about smoothing out the brows. Depending on how thick your eyebrows are will determine how many layers you need. Luna Lestrange said she used 3 however I think I used 5 and could well have done more! Its all practice makes perfect and getting your skill and technique down! If you feel your brows and they feel crispy, then keep going with your layering. You want them to feel as smooth as possible so keep going to help get that perfect finished look.
There is a gross technique Luna suggests which she learnt from Trixie Mattel which is that before you go in with your last layer of glue, lick the glue stick! Get it really wet and that then helps to smooth the last layer out. YES, I did this! I licked glue in the name of cosplay folks! Obviously, do not eat glue, do not ingest glue, and do this at your own risk! Most glue sticks are nontoxic as they are designed for kids to use who do exactly this for fun! The same as all the other layers just use a baby wipe to remove excess above and below the brow and wait for the layer to almost dry.
You then layer on your loose powder. I
used a Revolution loose powder which is different to the products Luna
Lestrange was using. Should I do this character more I would use more professional
SFX make up. Load up a dry beauty blender with a lot of powder and press it on
the brow and the surrounding area before the glue fully sets. Leave it to set
for 5-10 minutes, brush away the excess powder and then you’re done with brows
for now.


Make Up
For the green Gamora make up I watched this video by Shonagh
Scott
and this one by Flawless by Tenisha
I decided to apply the green using a brush. I brought a cheap pack from Primark that I wouldn’t mind wrecking for face paint. Simply wet the brush and paint on! Layer the paint until you are happy and talc away to lock it in. You can also use setting spray to help and hairspray to ensure it stays put.
For my eyes and face I used Afflano Highly Pigmented Green
Eyeshadow Palette Eye Makeup Kit. It was £8.99 on Amazon Prime and I used this
more my eyes, highlighting on my face, the base for my lip, on my arms, hands
and chest. This pallet was great for the price and highlighted well. I received
many compliments about the metallics and the depth the colours gave the overall
look. Face paint can be very flat so using the different powders like you would
to contour and highlight helps give a more real look. I used this pallet to contour my face in lights and darks the same as any other contouring to help shape and give depth.
https://www.amazon.co.uk/dp/B09MYFP9NK/ref=cm_sw_r_apan_i_18484HSKKZAHCDJ1CJY3?_encoding=UTF8&psc=1
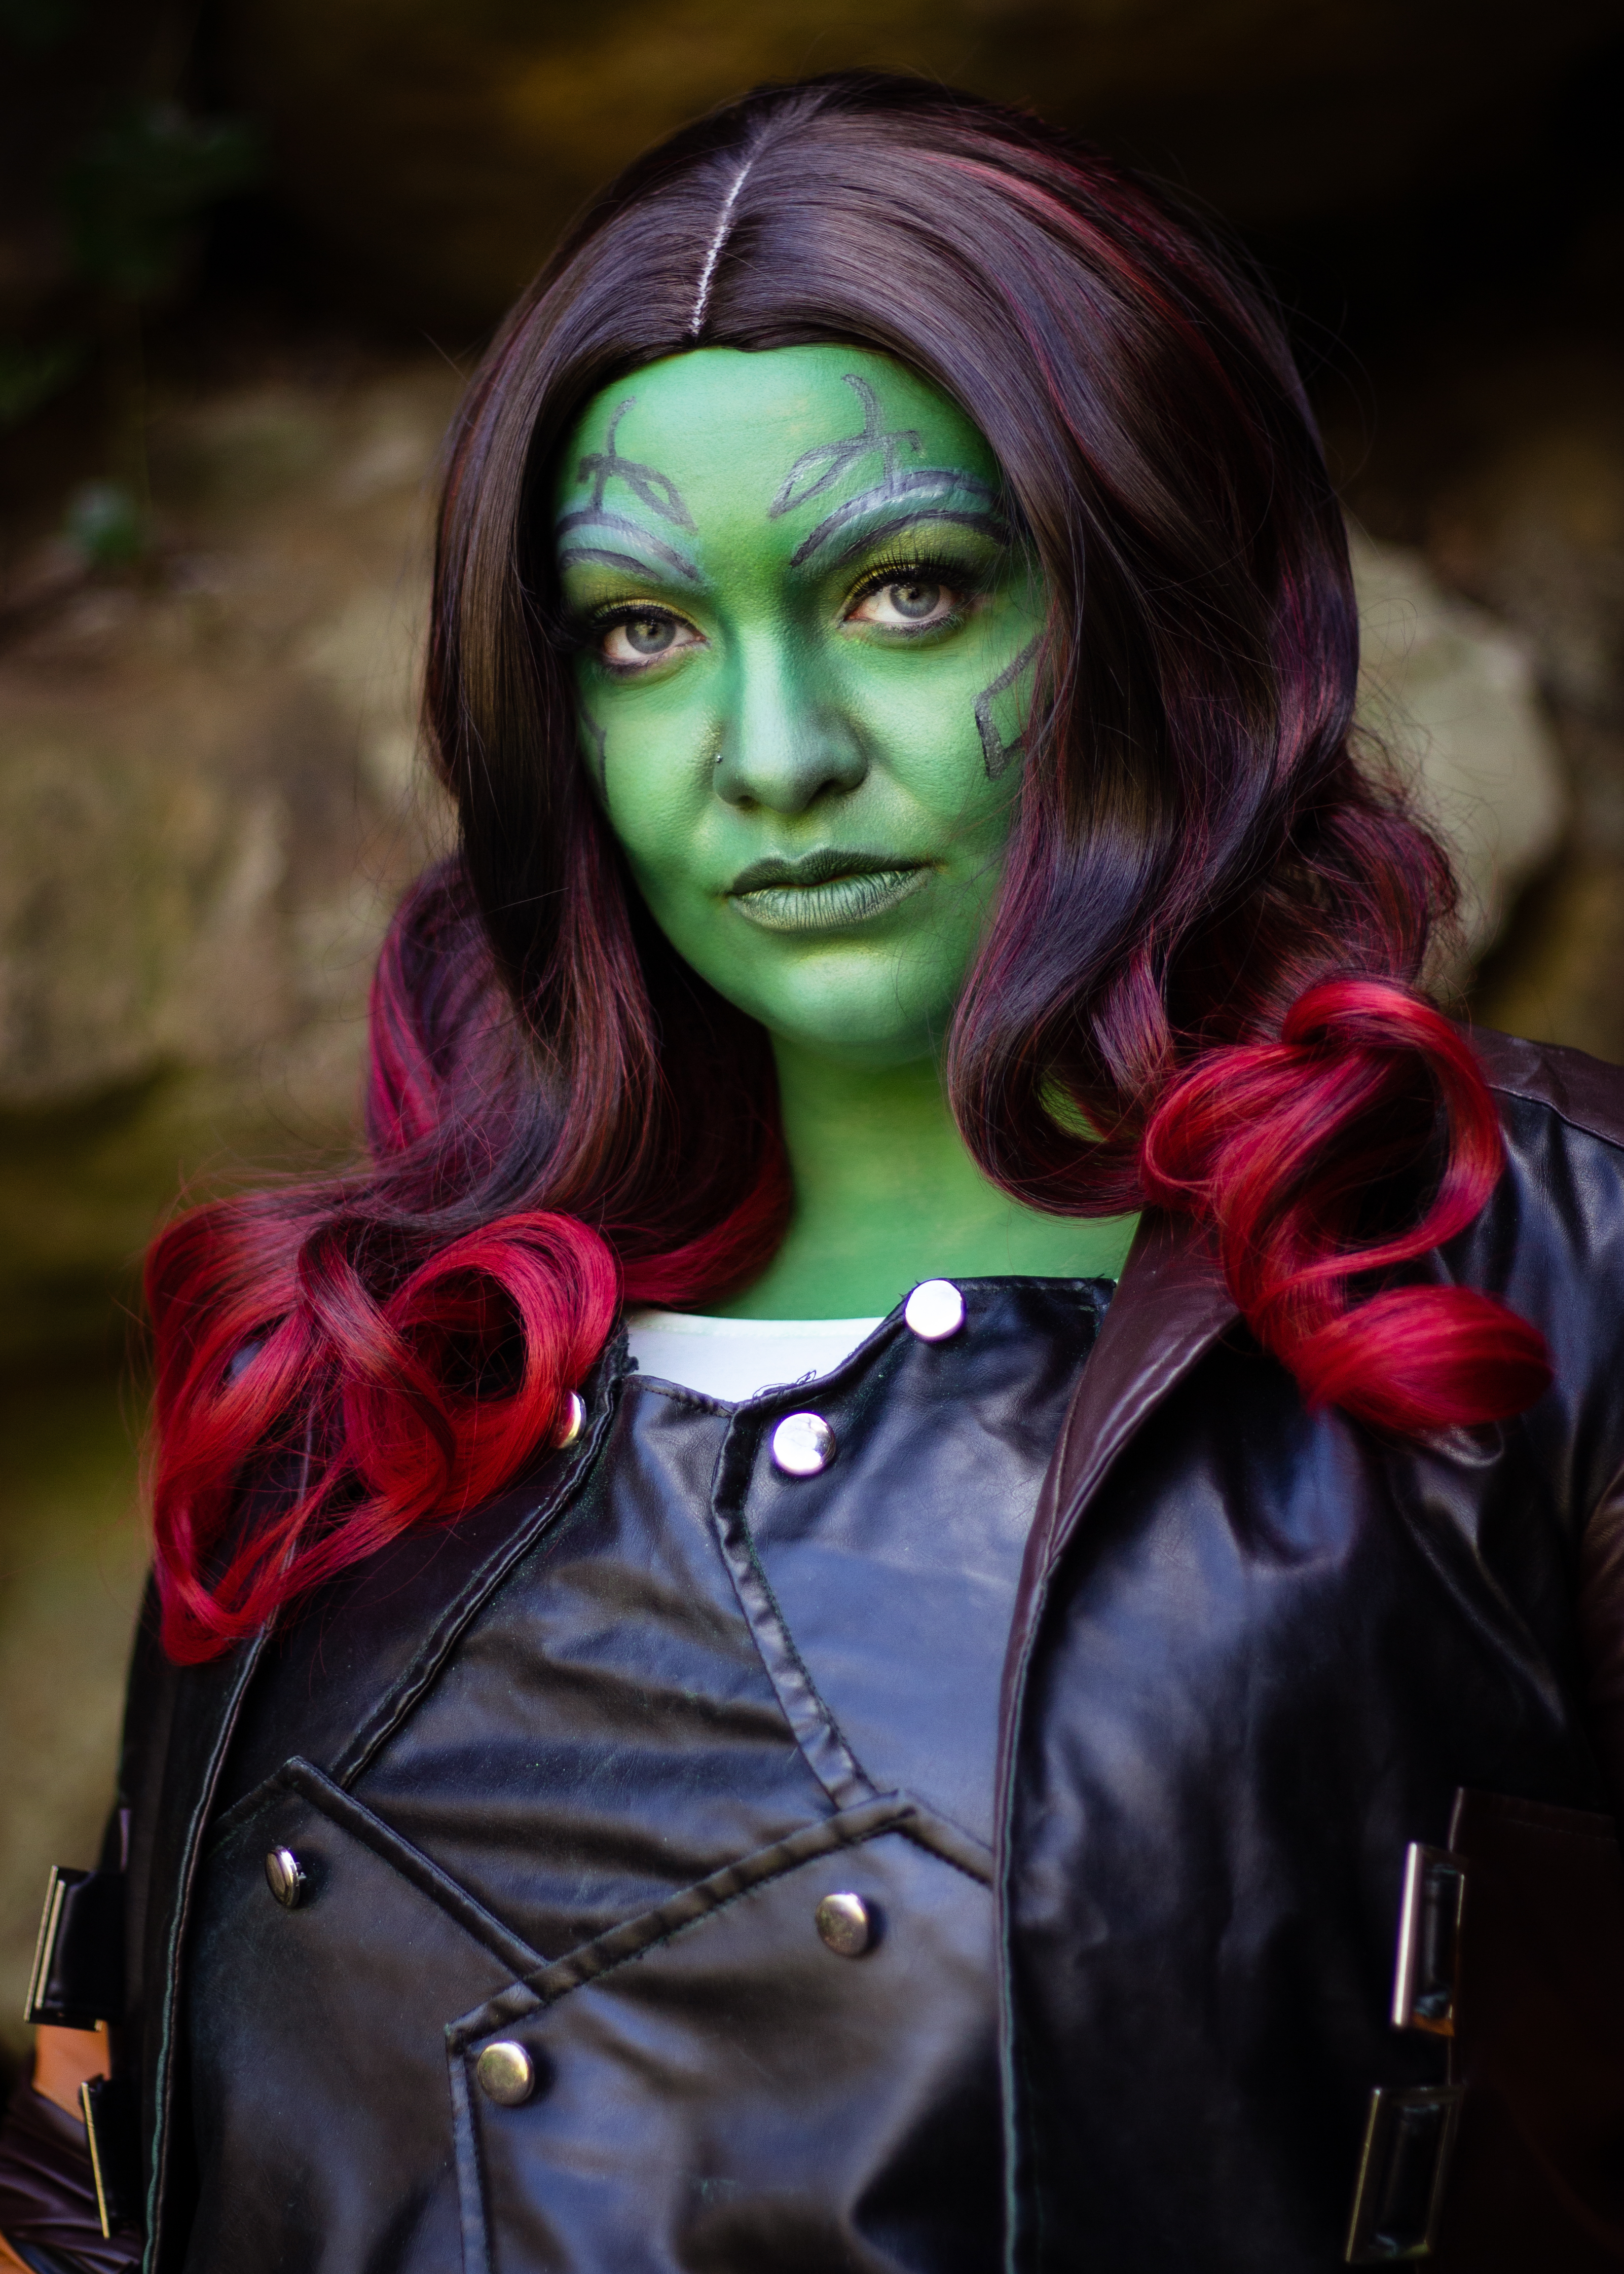
I didn't have a product to make the scar like lines across her face so as per one of the tutorials I watched I did the lines in black and went over them in silver face paint. This however didn't work so well, possibly due to the silver product used.
I used a mixture of face paint and the 2 green lipsticks purchased to do the lips.
I used different shadows to create the gold eyes and used eyeliner and false eyelashes to finish.
I painted my arms and hands in full, allowed to dry and built
up. I layered up with talc and then added some eyeshadow powder over the top. I
was fully expecting the paint to rub off and transfer on the arms and hands
during the day, but it didn’t shift at all! Which was great but worried me at
the same time! I was concerned that it wouldn’t come off and I’d stay green for
weeks! However, It washed off just fine with soap and water no problems. Top
tip, just like if you are fake tanning the colour will stick to dry areas so be
sure to prep your skin, moisturise especially dry areas such as knuckles and
elbows. You can still use a primer on other areas of your body and setting
spray the same as on your face.
Nails
For a finishing touch I used Sinful Colours Professional
nail varnish #946. This is the screen accurate nail colour used in the film.
This will also give you a good indication of the skin colour to aim for. It’s
an American brand and not one I had come across before. I managed to pick this
up for £3.49 off Ebay.
 |
| Picture by Rolling Speed Photography |
This whole process took a number of hours. The make up and face paint stayed all day. Sometimes I used a little setting powder on my face to take away a bit of shine and help keep things in place but generally the only touch up I needed was my lips and my eyes kept watering so the corners of my eyes. I'd recommend taking your core products with you for touch ups. I had one eye that kept watering all day so i needed a green, setting powder to keep things in place, green lippy to top up!
At the end of the day I just used soap and warm water and it all washed straight off. The colour didn't transfer to much considering the amount of paint I had on. It was surprisingly easy to get it all off ok. You can see from the picture how I has my wig cap lower than my actual hair line so the face paint didn't touch it at all. A friend told a horror story of face paint getting in her hairline and not coming out and this saved any potential hair issues!


I have of course learnt some lessons from my first trial. Here's what I will do differently:
- Use a different product for the silver line detailing as the face paint just didn't show up well enough
- Use a scar products to make the indented lines
- Prime more including on hands/elbows and dry skins areas
- Invest in a few more expensive (Kryolan) products for a better finish
- Time......it takes so much longer than you think. Start earlier!
Overall I think for having cheap products last minute and never doing this before it turned out ok and recognisable as the character.
 |
| Picture by Rolling Speed Photography |
Let me know how you get on!
Editor In Chief and Head Writer
No comments:
Post a Comment