

Often, it only takes small tweaks and upgrades to take your cosplay to the next level. We all make mistakes when we are starting out with cosplay, and even when we have years of experience sometimes we can make little improvements to raise our cosplay game!
Here are some examples of improvements I’ve made to cosplays
throughout the years!
Glow Up 1: Lara Croft
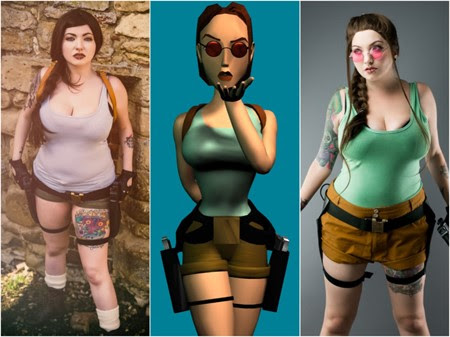
Lara was the first cosplay I ever did back in 2017! I
couldn’t find the right colours for the vest and shorts, so I settled for
something I thought would work. I had never worn a wig before, and I certainly
didn’t understand lace front wigs! I picked a cheaper hard front wig with a
fringe as it seemed like an easier option. I didn’t know how to cut or style a
wig, so I just pinned the long fringe to one side. The wig was layered, so
shorter bits of hair were poking out of the braid. In terms of make up, I just
did my make up how I usually did. That meant big, heavy emo eyeliner and darker
lips.
Overall, I felt like the cosplay worked really well at the
time. However, once I gained some more experience in cosplay I revamped it. I
made sure to get brown shorts instead of the khaki I was wearing previously. I
was struggling to find the right colour top, so I got a bodysuit and dyed it to
the correct colour I needed to match her classic look. I now had experience
with lace front wigs, so I made sure to get a lace front with all one length of
hair. I French braided it properly leaving strands at the front which Lara
often has hanging out. I made my make up much softer and more natural looking
with a nude lip to match Lara better.
These changes weren’t big or difficult changes, but they’ve
made a HUGE difference to the cosplay!
Glow Up 2: Nurse Joy

I first wore this at a photo shoot. I had done a good job styling
the wig, but the wig wasn’t very long so the hair loops weren’t very big; they
didn’t stand out as much as I would have liked. Her loops are actually pretty
big! Her fringe bump is actually pretty big too, and after looking at the first
photos I felt like it needed to be bigger. I also forgot my nurse cap (dough!).
I bought a new wig of a much longer length; and made the
hair loops much bigger! To make the loops, I got foam bendy rollers, glued two together to make an extra long one and bent it into a circle. I then glued that
in place directly onto the wig base, and wrapped the hair around it, gluing it
in place as I went. I made the fringe bump a lot more extreme too! I feel like
this is a lot more accurate to her hairstyle! And of course, I made sure to
remember the nurse cap!
Glow up 3: Harley Quinn

Harley had some subtle changes, and honestly looking at her
I would make more changes if I cosplayed her again! The main change here was the wig.
The wig came pre-styled, so I just wore it as is straight out of the bag. That
doesn’t always work though! The curls were too smooth, it was all too neat
which made it look fake – it looked like a wig. I also had the ties that came
with the wig and not her actual ones. When I did it again, I took the ponytails
out, brushed the curls out, and styled the ponytails in a way to look more
natural. I also kept 2 pieces of hair out at the front and cut them shorter, ad
she has strands which frame her face. The result is much closer to her hair,
and looks more realistic!
If I were to revamp her again, I would also weather the
shirt, add more holes like hers etc to make it look more authentic!
Glow up 4: Merida

Onto Merida – first; the wig. At the time I thought this wig
would be great. Huge curly ginger wig, perfect! However, looking back it
honestly gives me clown vibes. It’s not right, and it doesn’t look realistic. I
replaced it with a different wig and boom; it was so much better! I also added
some fake freckles with the make up!

Another improvement I made was to the bow. I had made the
bow myself using foam and worbla, but I hadn’t smoothed the worbla seams out
and removed the texture very well. So I went back to it, used polyfiller and
sanding to smooth the whole thing out and repainted it! It looked a LOT better
after making these tweaks!
These are just some examples of upgrades I have made; and
you can see that sometimes it really only takes tiny little changes to make a
big difference! It’s always a good idea to take a step back, look at your
cosplay and try to spot anything that could elevate it to the next level!
Ley Ley Cosplay
Writer
No comments:
Post a Comment